An independent browser game with original creatures
PokéBonk Survivors: play the free online game
PokéBonk Survivors is an independent, single-player monster-collecting survival game. Choose from eight original creatures — six ready to play and two unlocked through collection and challenges — recruit defeated elites, awaken at level 6 and take your team through three boss encounters. Play free in your browser; no download or account is required.
151 original creatures & forms · Fill your field journal by choosing heroes, awakening them, defeating wild creatures and bosses, and binding partners. Four worlds each hold 15 new partner families. Each new partner has an awakened form.
Keep moving while your attacks fire automatically. Collect experience and recruit allies along the way; awakening and captures can happen in either order.
Capture an elite
Defeat a marked elite and choose Bind in the capture offer. Ordinary enemies give experience; they cannot join your team.
Choose Wander and Greenmere for your first run. Six original starters are available; Mossheart is a useful first choice for its recovery. Try the other stages after learning movement and experience pickup.
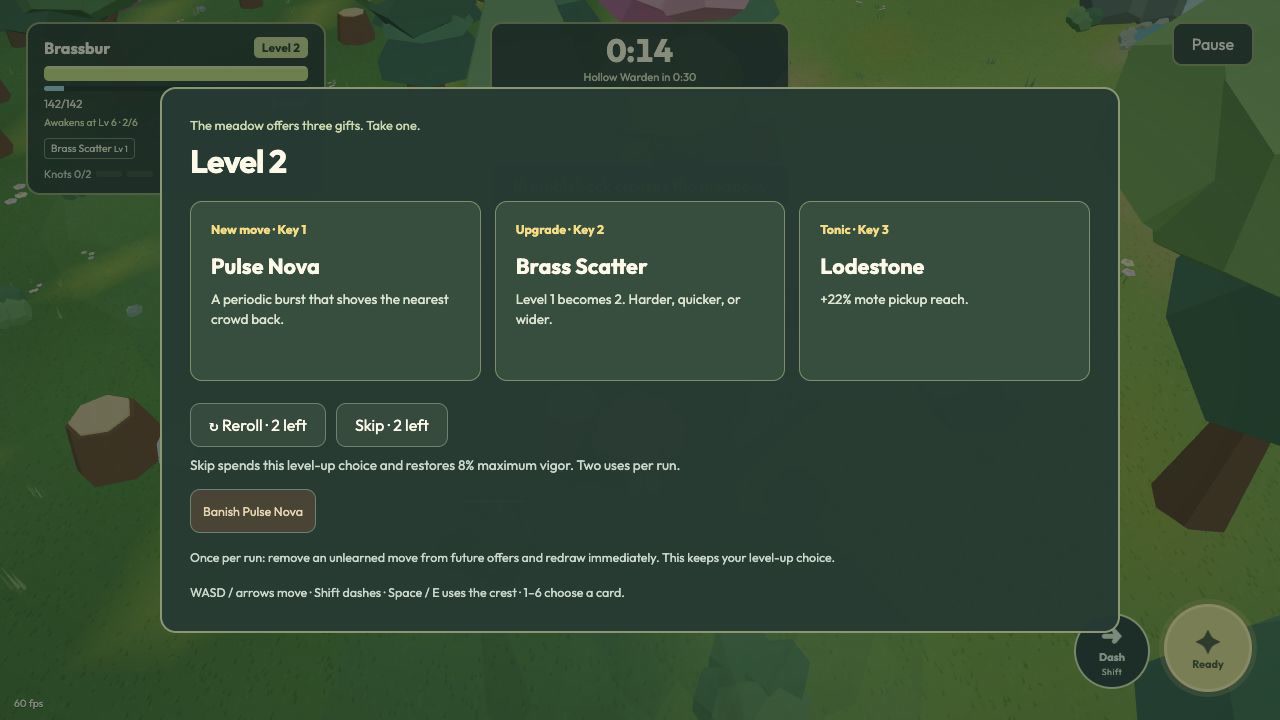
Your attacks fire automatically. Keep moving, collect glowing experience motes and choose one of three upgrades when you level up. Each run has two free rerolls for those choices.
Reach level 6 to awaken your creature. Defeat marked elites to recruit companions, then overcome Hollow Warden, Kiln Titan and Rift Matron to finish the run.
WASD / Arrow keys
Move through the forest
Shift
Dash with brief invulnerability; 2.4-second cooldown, or 1.8 for Lumenloop
Space / E
Use your ultimate when the crest is full
1 / 2 / 3
Choose an upgrade card
Esc
Pause or resume
Touch controls
Drag on the left to move; tap the dash and crest buttons on the right
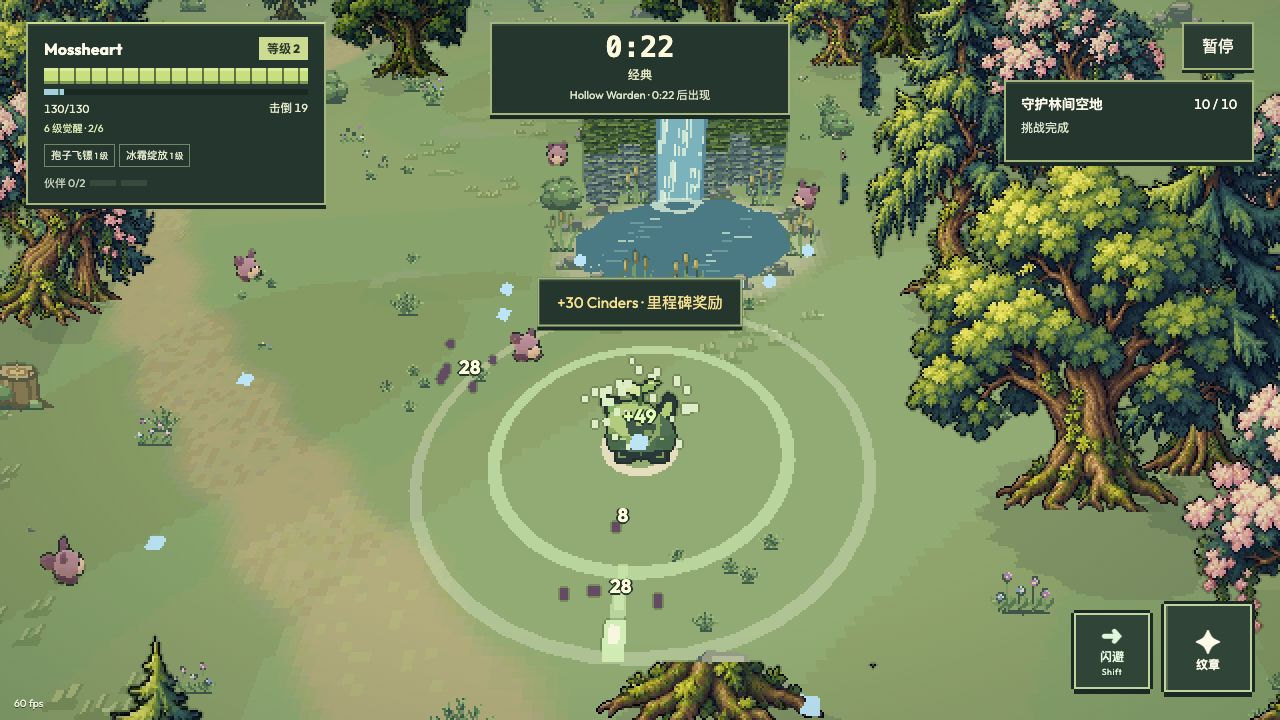
Pixel art · Mossheart in Greenmere · use Bloomwell to heal and push back the crowd beside the forest spring. Switch the characters, scenery, effects and interface together in settings or while paused.
PokéBonk Survivors gameplay
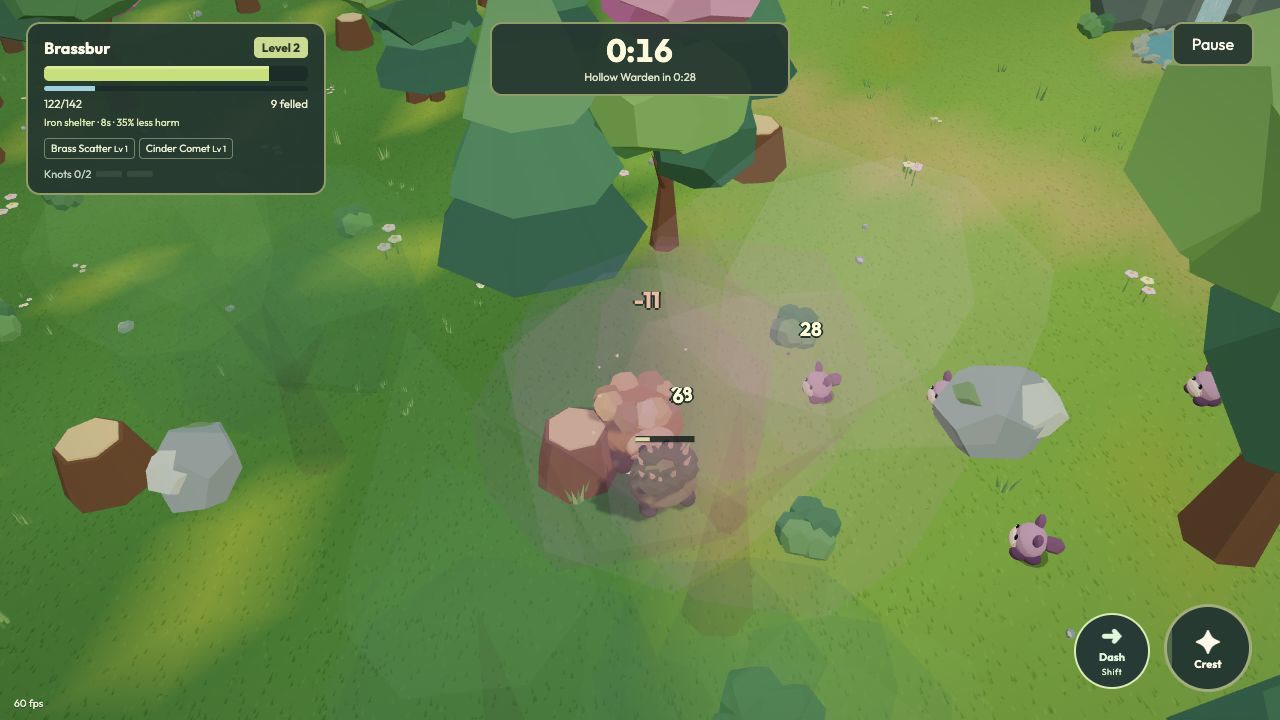
Watch a continuous battle from PokéBonk Survivors with 3D characters. The screenshots below show the complete interface and upgrade choices. Brief pauses in the video correspond to menu selections.
3D characters · Mistwhorl in Greenmere · Wander · keyboard controls · silent gameplay.What happens in the clip
Move to leave space between your creature and the swarm; attacks fire automatically.
Collect experience and choose an upgrade when you level up; combat pauses while you choose.
Use the charged crest to damage the nearby crowd and create room to move.
Each starter has its own passive ability, automatic attack and charged ultimate. Their awakened forms keep the same identity while changing their silhouette and increasing their strength.
Sunspool — Bind 4 different elite species
Veilwing — Complete challenges in 2 different woods
Mossheart
A peat-hearted tender that knits wounds while the swarm closes in.
Passive
Regenerates vigor and slowly mends companions.
Auto
Spore darts that cling and slow.
Ultimate
Bloomwell — a sap burst that heals you and harms the ring around you.
Awakening at level 6: Crownmoss
Cinderfang
A kiln-born stalker that worries prey until they catch.
Passive
Strikes leave a lingering burn.
Auto
Fast ember spit.
Ultimate
Pyre Ring — a wide wheel of kiln-fire.
Awakening at level 6: Ashmaw
Tideward
A reef bulwark that takes the hit and answers it.
Passive
Turns aside some harm and pricks anything that lands a blow.
Auto
Heavy tide orbs that punch through.
Ultimate
Bulwark — a short shell of safety and a shoving wave.
Awakening at level 6: Leviglass
Lumenloop
A loop-crowned runner that threads light through the crystal woods.
Passive
Dash recharges in 1.8 seconds instead of 2.4.
Auto
Guiding sparks curve toward nearby foes.
Ultimate
Halo Burst — pushes and damages the nearby swarm, and resets dash cooldown.
Awakening at level 6: Halocrest
Brassbur
A plated seed-beast with a broad shell and a scattershot bite.
Passive
Starts with 3 armor.
Auto
Three brass fragments in a close fan.
Ultimate
Iron Shelter — a shoving burst and 35% less incoming harm for 8 seconds.
Awakening at level 6: Bastionbur
Mistwhorl
A ribbon of mist that draws stray motes into its wake.
Passive
Starts with 12% more experience gain and 20% more pickup reach.
Auto
Chill orbs pierce two foes and slow them.
Ultimate
Stillwater — freezes nearby enemies for 2 seconds and attracts all loose motes.
Awakening at level 6: Tempestwhorl
Sunspool
A gold-thread creature that weaves sunlight into twin piercing beams.
Passive
Gains 20% more Crest charge.
Auto
Twin Sun Threads pierce the swarm.
Ultimate
Solar Loom — fires a ring of burning, piercing threads and restores 20% of your health.
Awakening at level 6: Dayweaver
Veilwing
A folded-sail glider that gathers the night into its wings.
Passive
After dashing, its primary strike deals 40% more damage for 2.4 seconds.
Auto
A swift piercing Night Stitch.
Ultimate
Nightfold — pulls nearby non-boss foes inward, slows them and grants 1.2 seconds of protection.
Awakening at level 6: Nightsail
Capture elites and build a team
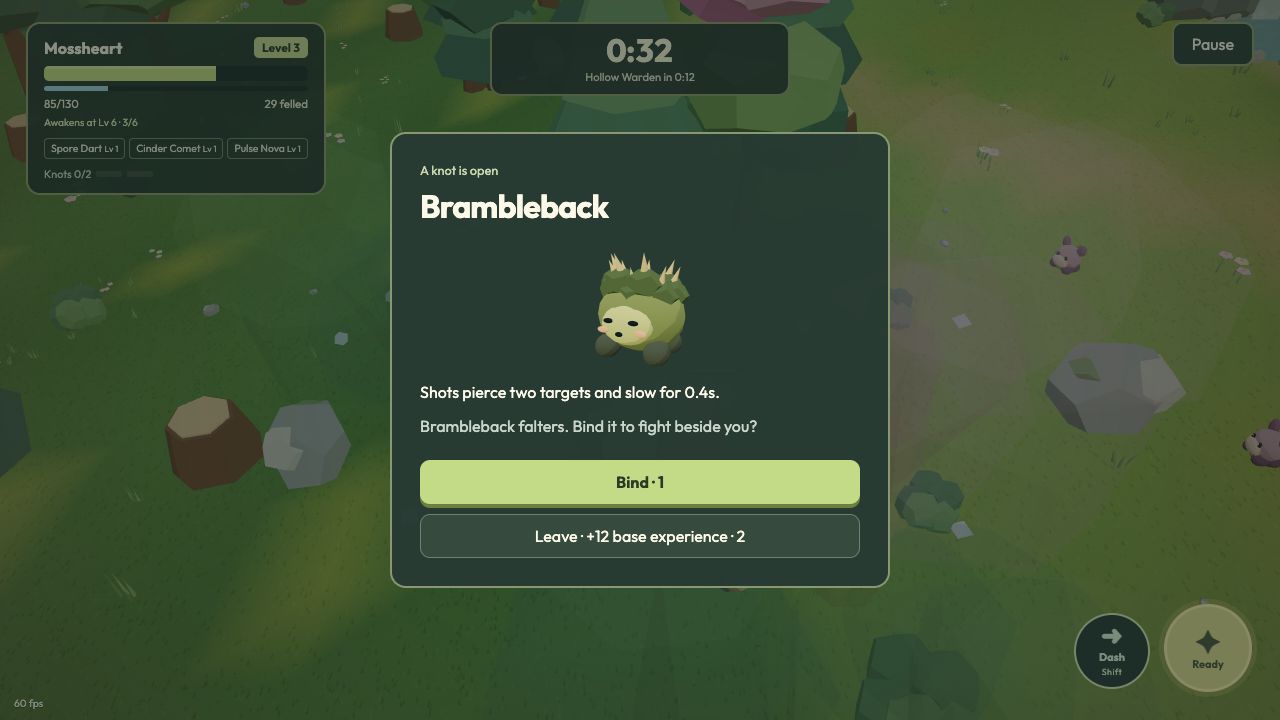
To recruit a companion in PokéBonk Survivors, defeat a marked elite and choose Bind when the capture offer appears. You start with two companion slots. Third Knot in the Cinder Lab unlocks a third slot for later runs. Companions follow and attack automatically; a fainted companion rests before returning. If all slots are occupied, choose a companion to replace or leave the offer for experience. Successful bindings are recorded immediately in your field journal.
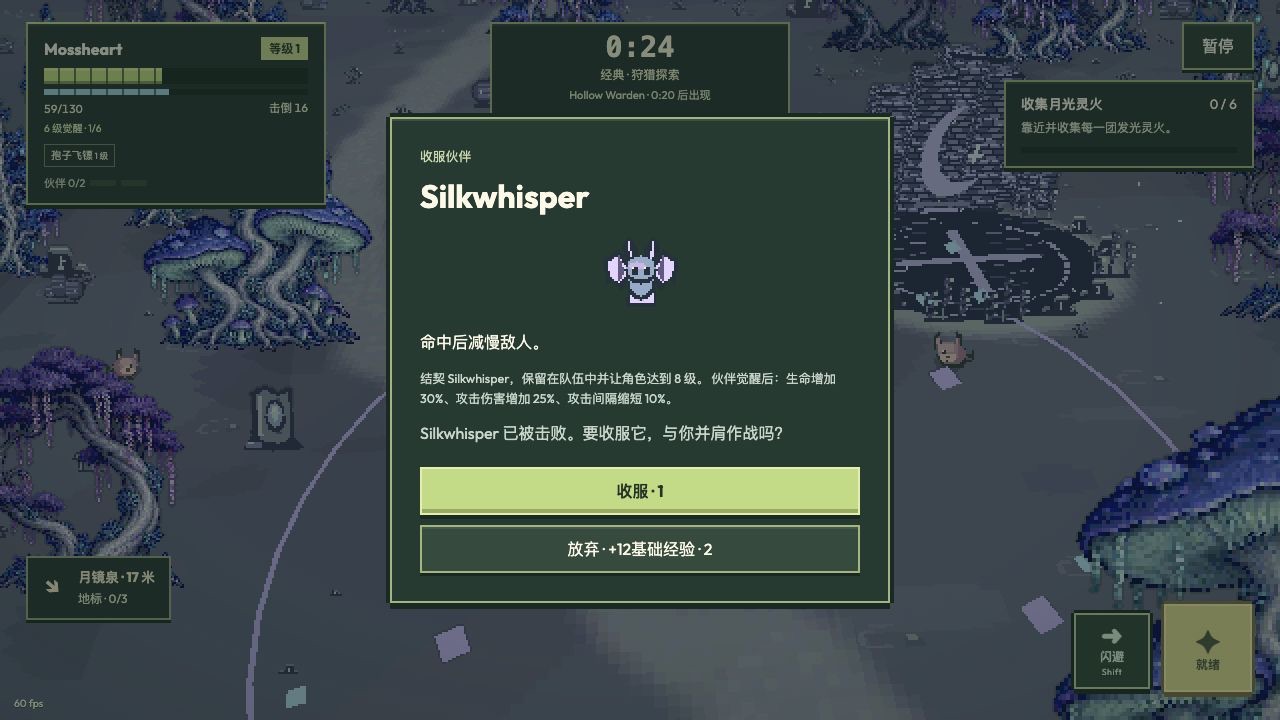
0:32 — Brambleback is defeated. Choose Bind to add this companion, or Leave for 12 base experience. The team still has both slots free.3D characters · Greenmere · Wander · Hasty trial · keyboard and mouse.
Ironroot
An armored root walker that fires heavy piercing splinters.
Duskfin
A broad-finned glider that spreads three dusk shards.
Dewbell
A bell-shaped sprout that gently mends you while awake.
Gleamcap
A floating lantern cap whose shots slow nearby foes.
Brambleback
A thorned hulk that shrugs off small shots.
Voltwhisk
A quick meadow streak with a crackling bite.
Gloomslug
A slow violet mass that soaks punishment.
Shardwing
A glass-winged hunter that darts and cuts.
PokéBonk Survivors collection rules
There are 8 original playable creatures, each with an awakened form, and 68 recruitable companion families. Mossheart, Cinderfang, Tideward, Lumenloop, Brassbur and Mistwhorl are available from the start. Bind four different elite species to unlock Sunspool, or complete challenges in two different stages to unlock Veilwing. Ordinary enemies and bosses cannot be recruited.
The journal has 151 original entries: 16 hero forms, four wild creatures, three guardians, eight founding partners and 120 forms from 60 new partner families. Choose a hero, awaken it, defeat a wild creature or guardian, or bind a partner to earn its entry. Seeing a creature alone does not record it.
There are 68 partner families. Defeat a marked elite and accept its binding offer: success is guaranteed and costs no capture item. Wild Nib, Skitter, Mote and Lump can be recorded by defeating them, but cannot join your team.
Start with two partner slots. Third Knot costs 50 Cinders and adds a third slot. At capacity, choose a partner to replace or decline for 12 base XP. Duplicates take separate slots and do not add a new family to collection milestones.
The 60 regional partner families awaken when your hero reaches level 8 while they are in your team. Binding one after level 8 awakens it immediately. Awakening records a second entry and adds 30% partner health, 25% damage and a 10% shorter attack interval. Founding partners have one form.
Partners follow and attack automatically. A fainted partner recovers fully after eight seconds of active play and still occupies its slot. Pause and upgrade choices also pause recovery. New partner traits include spread, piercing, homing, slow, burn, healing, protection and rapid attacks.
Partner teams and awakenings last for the run. Journal entries save when you bind a partner or finish the run; unfinished runs cannot resume after closing the page. Signed-in players can sync saved progress through Account & cloud save.
Bind 1, 4 and 8 different partner families to earn 20, 45 and 90 Cinders once each. Awakening and duplicate bindings do not count as additional families. Four families unlock Sunspool; two different stage challenges unlock Veilwing.
The first elite arrives after 18 active seconds, then every 32 seconds; Hasty uses 12 and 16 seconds. Each world has 15 regional families; every fourth elite keeps a founding partner in the rotation. Founding partners keep their named pair abilities. Regional partners use the roles shown in the journal: combine two different, conscious families to activate a regional team effect. Their 60 automatic signatures gain an extra mechanic on awakening; the journal lists targets, cooldowns and effects.
PokéBonk Survivors collection rules
Companion
Health
Base shot
Interval (s)
Ability
Brambleback
96
9
0.9
Shots pierce two targets and slow for 0.4s.
Voltwhisk
70
6
0.42
Fast homing shots seek nearby foes.
Gloomslug
110
11
1.05
Shots apply a 1.4s burn.
Shardwing
74
7
0.55
Quick, straight glass shots.
Gleamcap
90
8
0.8
Lantern shots slow for 0.9s.
Ironroot
125
14
1.4
Heavy shots pierce three targets.
Duskfin
76
5
1.1
Each volley fires three shards in a fan.
Dewbell
86
4
1.25
Restores 0.6 player vigor per second while awake; also fires light shots.
Base shot values are before the shared damage multiplier: base × (0.8 + player damage multiplier × 0.35). Projectile speed, spread, range, status effects and missed shots also matter; this table is not a damage-per-second ranking.
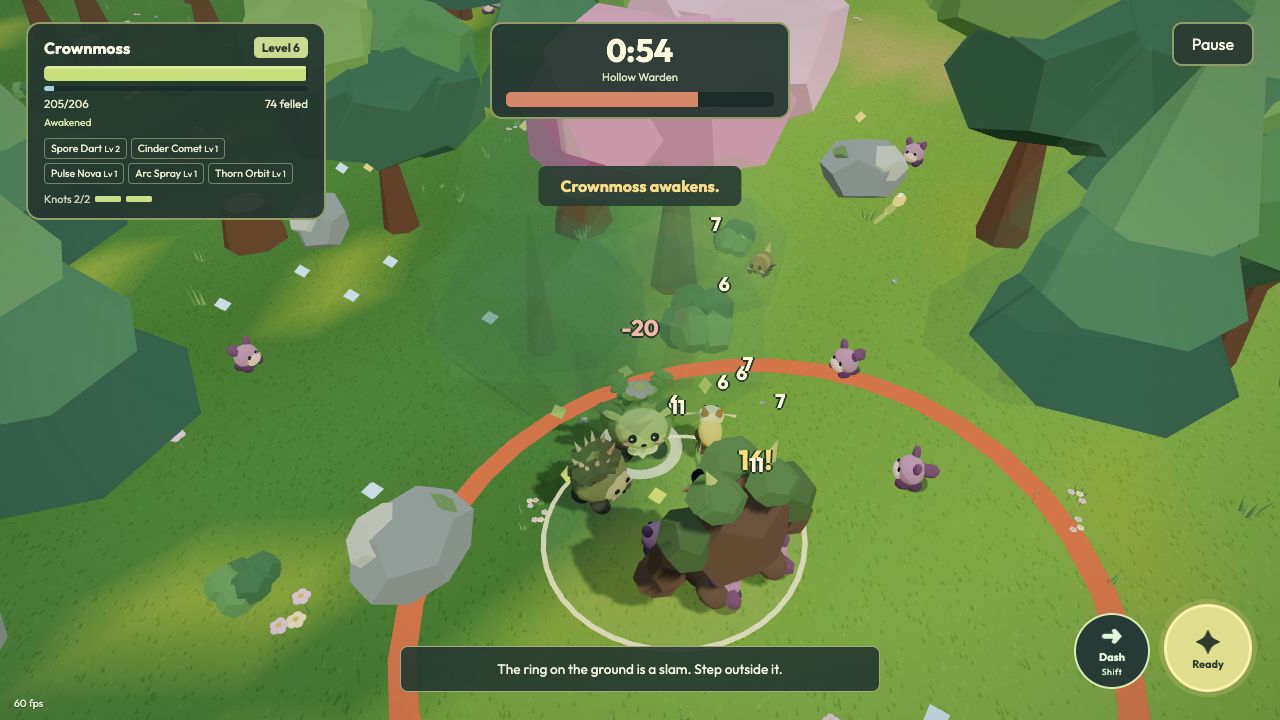
Collect experience to reach level 6 and awaken your starter. In the battle below, Mossheart becomes Crownmoss while fighting Hollow Warden. Your companions stay with you after awakening. Each new run begins with your starter’s base form.
0:54 — Mossheart awakens into Crownmoss during the ongoing boss fight. Both companions stay on the team after awakening.3D characters · Greenmere · Wander · Hasty trial · keyboard and mouse.PokéBonk Survivors characters ↑
Four places to learn and explore
Choose any of the four stages in the main-menu options. Start with Wander, or choose Maelstrom for tougher fights. A stage challenge appears near you after 18 seconds of active play, or 8 seconds in Hasty trial. You can finish it alongside the main run; defeating three bosses remains the victory condition.
Greenmere: a bright forest without timed ground hazards. Its challenge asks you to stay inside the marked ring for 16 seconds in total, or 10 in Hasty trial. Move within the ring to avoid enemies; stepping outside pauses your progress without erasing it.
Ashmere: fire warnings begin at 10 seconds and repeat every 16 seconds at your current position. Leave before the 1.2-second warning ends; the fire lasts 4 seconds and can hit repeatedly. For the challenge, defeat six gold-marked enemies, or four in Hasty trial. These targets are ordinary enemies and cannot be bound.
Moonveil: from 12 seconds, a moon pulse marks a fixed position every 18 seconds. Leave its 3.2-radius circle during the 1.6-second warning or use an invulnerable dash across the burst; base damage is 14. The challenge places six lights around its center. Walk close to each one, in any order, to collect them all.
Rimefield: from 14 seconds, three frost circles appear every 20 seconds. After a 1.4-second warning they slow movement by 35% for 3 seconds without direct damage. The separate challenge asks for three successful frost-burst dodges: leave each warning circle within 1.5 seconds while staying in the challenge area. Being caught deals 8 base damage and you can retry; earlier successful dodges remain counted.
Complete a stage challenge once per run to restore 25% of maximum health, gain 25 crest energy and add one reroll, up to three held at once. The first completion in each of the four stages also awards 30 Cinders permanently. Repeating that stage cannot award its first-clear Cinders again. Complete two different stage challenges to unlock Veilwing. Pausing or choosing an upgrade pauses challenge progress and warnings.
PokéBonk pixel battle in Moonveil: Mossheart faces Silkwhisper among moonwood trees, indigo mushrooms and scattered challenge lights.
Moves, upgrades and rerolls
Build your PokéBonk Survivors team around your starter’s primary attack and additional moves. Level-up choices can introduce a move, strengthen a move you already know or improve a stat with a tonic. Try area control with Thorn Orbit and Pulse Nova, or attack through groups with Sap Lance. The two rerolls belong to the current run; they refresh when you start again.
Frost Bloom
A wide chill burst slows enemies for 2 seconds. Upgrades add reach and damage and shorten its cooldown.
Cinder Comet
Marks a nearby foe’s position; a burning blast lands there 0.6 seconds later.
Seedwheel
Eight seeds fly outward in every direction, each piercing two targets.
Thorn Orbit
A ring of thorns circles you and cuts anything that steps through.
Arc Spray
A wider fan of shots, fired on its own cadence.
Pulse Nova
A periodic burst that shoves the nearest crowd back.
Seeker Motes
Slow motes that bend toward the closest foe.
Sap Lance
A piercing line that runs through several bodies.
Modes, skill links and guardian phases
Classic
Defeat three guardians and reach dawn.
Endless
Guardians repeat in order; enemy strength rises to a capped level. Each guardian defeat restores 15% health and 20 Crest charge. Each pact can be chosen once. The run ends when you fall or end it from Pause; records update at settlement.
Today’s challenge
Fixed creature, wood and difficulty. Fast boss timing; Lab upgrades are inactive. Upgrade choices still vary. Refreshes at 00:00 UTC; a run keeps its starting date.
Complete the objective, then finish the run to earn 50 Cinders once that day. Replays still earn normal run rewards.
Skill links
Raise both linked moves to level 2 to activate their extra effect.
Glassfire
Frost Bloom + Cinder Comet: a comet hitting a chilled target releases an extra icy burst. Cooldown 2.5s.
Briarwheel
Thorn Orbit + Sap Lance: casting the lance launches six thorns around you. Cooldown 3s.
Spark relay
Arc Spray + Seeker Motes: a seeker hit jumps to two nearby enemies. Cooldown 1.5s.
At half health, guardians enter phase two after a safe warning: Hollow Warden releases two waves, Kiln Titan leaves a burning charge lane, and Rift Matron marks five strikes. Keep moving out of the warnings.
Awakened signature
At level 6, your creature gains its own signature. Build around the way it fights.
Mossheart · Root Chorus
Every fourth primary volley releases a slowing root wave. Hitting a foe restores health to you and nearby partners.
Cinderfang · Kiln Chain
Primary hits on burning foes trigger a nearby blast, with a short cooldown.
Tideward · Reef Breaker
Every third primary volley adds a wide, piercing tidal fan.
Lumenloop · Lantern Chase
Dashing launches three homing lights. Use movement to attack.
Brassbur · Seed Bastion
Find a safe gap and stand still for 0.9 seconds to fire a heavier piercing spread. Move again before danger closes in.
Mistwhorl · Frost Harvest
Collect six experience motes to release a freezing ring, with a 2-second cooldown.
Sunspool · Sunthread Chorus
Your crest wakes fainted partners and lets them fire extra sunthreads for six seconds.
Veilwing · Night Echo
Dashing leaves an echo that repeats up to three primary attacks for 2.4 seconds.
Companion bonds
Two different partners can fight together. Both must be awake; duplicates do not complete a pair.
Briar Circuit
Brambleback + Voltwhisk: nearby lightning damages and slows a group. 6-second cooldown.
Mistflare
Gloomslug + Shardwing: a blast burns and briefly freezes targets. 7-second cooldown.
Lantern Ward
Gleamcap + Ironroot: gain a short damage-reduction shield and heal active partners. 9-second cooldown.
Explore the wilds
Three landmarks appear during each run. Follow the compass and stay inside a landmark circle for 1.4 seconds to claim it. Each is usable once per run; all bonuses end with that run.
Greenmere
Wayfarer Spring
Restore 30% of maximum health, gain 20 crest charge and restore your partners.
Trail Cache
Gain 36 base experience and one reroll, up to three rerolls.
Echo Shrine
Gain 60 crest charge and +8 percentage points of attack power for this run.
Ashmere
Cooling Spring
Restore 30% health and 20 crest charge; extinguish existing fire zones within 12 m.
Foundry Cache
Gain 36 base XP and one reroll (up to 3). All your attacks become ready immediately.
Ember Anvil
Gain 60 crest charge and +0.08 damage multiplier. Hits apply 0.7 extra seconds of burn for this run.
Moonveil
Moonwell
Restore 20% health and 20 crest charge. Revive and fully heal partners; their attacks and pair abilities become ready.
Stardust Cache
Gain 36 base XP and one reroll (up to 3). Attract all experience motes already on the field.
Echo Stone
Gain 60 crest charge and 25% more pickup range for this run.
Rimefield
Trail Hearth
Restore 30% health and 20 crest charge, ready your dash and clear existing frost zones within 12 m.
Icebound Cache
Gain 36 base XP, one reroll (up to 3) and 8 seconds of protection that reduces damage by 35%.
Aurora Monument
Gain 60 crest charge, +1 armor for this run and 12 seconds of 35% protection. Freeze foes within 9 m for 2.5 seconds; bosses for 0.5 seconds.
151 original creatures & forms
Fill your field journal by choosing heroes, awakening them, defeating wild creatures and bosses, and binding partners. Four worlds each hold 15 new partner families. Each new partner has an awakened form.
Awakening: +30% partner health, +25% ordinary-attack damage, 10% shorter ordinary-attack interval, and the family’s extra signature effect.
New records save when you bind a partner or finish the run. An active run cannot be resumed after closing the page.
Regional partner skills
Choose partners for their target, signature skill and team role. All 60 regional families have an automatic signature and a new effect on awakening at hero level 8. Ordinary attacks continue between signatures.
Mix control with damage for dense swarms, or protection with recovery when surviving is harder. Each pair needs two different families; awakening the same family does not create a second partner.
Regional team combinations
Two different, conscious regional families with matching roles activate a team effect. Replacing a partner does not refresh its cooldown. Founding companions keep their own named pair abilities.
Grove ShelterNeeds Greenmere · Guardian + Mender
Grants 2s of protection, heals the hero for 3 HP and conscious partners for 6% health. Every 10s while fighting
Thorn PursuitNeeds Greenmere · Striker + Hunter
Strikes a line toward the nearest threat and slows hit enemies for 1.5s. Every 8s while fighting
Kiln ChorusNeeds Ashmere · Striker + Channeler
Blasts a 3 m area and burns enemies for 2.5s. Every 9s while fighting
Moon SnareNeeds Moonveil · Controller + Hunter
Strikes a 3 m area, pulls enemies inward and briefly freezes them. Bosses resist freezing and cannot be pulled. Every 9s while fighting
Grants 2s of protection and hits a 3.2 m area around the hero, slowing enemies for 2s. Every 10s while fighting
Resonant ChorusNeeds Mender + Channeler
Chains through up to three enemies, heals the hero for 2 HP and adds 4 crest charge. Every 10s while fighting
Greenmere · 15
Acornook → Oakenook
Three-shot fan · Fires three lighter shots in a spread. Acorn Bastion · Team role: Guardian Grants 1.5s of protection and hits a 2.8 m area around the hero. Area: around the hero · radius 2.8 m · Every 8s while fighting Hit effect: slow for 0.8s At level 8: Adds extra branching strikes.
Fernfable → Frondfable
Chilling shots · Hits slow enemies. Frond Script · Team role: Controller Strikes enemies along a narrow line. Target: cluster of enemies · detection 9 m · Every 6.5s while fighting Hit effect: slow for 1.5s At level 8: Also attacks behind the partner.
Petalisk → Bloomisk
Protective volleys · Every fifth successful volley grants 35% damage protection. Petal Shear · Team role: Striker Sweeps a fan toward its target. Target: nearest enemy · detection 4.2 m · Every 6s while fighting Hit effect: slow for 0.5s At level 8: Adds extra branching strikes.
Thimbleaf → Canopinch
Piercing shots · Shots pierce several enemies. Canopy Stitch · Team role: Mender Heals the hero for 3 HP and conscious partners for 5% health, then hits a 2.4 m area around the hero. Area: around the hero · radius 2.4 m · Every 9s while fighting Hit effect: slow for 1s At level 8: Also grants 1.5s of protection.
Reedroo → Rusharoo
Burning shots · Hits burn enemies over time. Rush Vault · Team role: Hunter Strikes and pushes the threat away, granting the hero 1s of protection. Target: enemy closest to the hero · detection 9 m · Every 5.5s while fighting Hit effect: slow for 0.8s At level 8: Also attacks behind the partner.
Cresskit → Cresswarden
Rapid attacker · Moves faster and fires more often. Cress Tether · Team role: Controller Draws nearby enemies toward the impact. Target: cluster of enemies · detection 8 m · Every 7s while fighting Hit effect: slow for 1.3s At level 8: Freezes enemies at the target for 0.65s (bosses: 0.15s).
Dapplepod → Dapplebloom
Homing shots · Shots steer toward nearby enemies. Dapple Volley · Team role: Striker Fires aimed shots at up to five enemies. Target: nearest enemy · detection 9 m · Every 6.5s while fighting At level 8: Adds a second impact after 0.5s.
Saplark → Amberlark
Healing presence · Restores a little hero health continuously while conscious. Amber Call · Team role: Channeler Chains through up to four enemies, jumping within 3.3 m. Target: strongest enemy · detection 9 m · Every 7s while fighting Hit effect: slow for 0.4s At level 8: Also heals the hero for 2 HP and conscious partners for 4% health.
Twiggle → Branchgleam
Three-shot fan · Fires three lighter shots in a spread. Branch Fork · Team role: Hunter Hits the target and up to two nearby enemies within 3.1 m. Target: lowest-health-percentage enemy · detection 9 m · Every 5.5s while fighting Hit effect: slow for 0.6s At level 8: Adds a finishing hit if the target is below 50% health.
Rootle → Deepburrow
Chilling shots · Hits slow enemies. Burrow Furrow · Team role: Guardian Strikes three points along the attack path. Target: enemy closest to the hero · detection 8 m · Every 7s while fighting Hit effect: slow for 1.1s At level 8: Also grants 1.5s of protection.
Bloomble → Florumble
Protective volleys · Every fifth successful volley grants 35% damage protection. Bloom Sanctuary · Team role: Mender Creates a 2.7 m field that strikes three times over 1.3s. Target: cluster of enemies · detection 8 m · Every 8s while fighting Hit effect: slow for 1s At level 8: Also heals the hero for 2 HP and conscious partners for 4% health.
Mulchkin → Loamkeeper
Piercing shots · Shots pierce several enemies. Loam Harvest · Team role: Mender Hits its target; a successful hit heals the hero for 2 HP. Target: strongest enemy · detection 8 m · Every 7s while fighting Hit effect: slow for 0.5s At level 8: Adds extra branching strikes.
Bristlefern → Thicketmane
Burning shots · Hits burn enemies over time. Thicket Wheel · Team role: Guardian Hits enemies in a ring around its center. Area: around the partner · radius 3.5 m · Every 7s while fighting Hit effect: slow for 1.2s At level 8: Also pulls enemies toward the impact.
Pollenip → Pollencrown
Rapid attacker · Moves faster and fires more often. Pollen Lantern · Team role: Channeler Hits a 3 m area around the hero. Area: around the hero · radius 3 m · Every 6.5s while fighting Hit effect: slow for 0.8s At level 8: Also heals the hero for 2 HP and conscious partners for 4% health.
Vinecap → Bowercap
Homing shots · Shots steer toward nearby enemies. Bower Cross · Team role: Controller Cuts two intersecting lanes through the crowd. Target: cluster of enemies · detection 9 m · Every 8s while fighting Hit effect: slow for 1.4s At level 8: Adds a second impact after 0.5s.
Ashmere · 15
Coalwick → Pyrewick
Piercing shots · Shots pierce several enemies. Wick Flare · Team role: Channeler Creates a 2.6 m field that strikes three times over 1.3s. Target: cluster of enemies · detection 8 m · Every 8s while fighting Hit effect: burn for 1.8s At level 8: Adds extra branching strikes.
Copperkit → Coppercrest
Burning shots · Hits burn enemies over time. Copper Rake · Team role: Striker Sweeps a fan toward its target. Target: nearest enemy · detection 3.8 m · Every 5.5s while fighting Hit effect: burn for 0.8s At level 8: Adds a finishing hit if the target is below 50% health.
Scorrel → Cinderrel
Rapid attacker · Moves faster and fires more often. Cinder Pursuit · Team role: Hunter Deals 80% more signature damage when the target is below 40% health. Target: lowest-health-percentage enemy · detection 9 m · Every 6s while fighting Hit effect: burn for 1.3s At level 8: Adds a chain to up to two nearby enemies.
Cindercoil → Furnacecoil
Homing shots · Shots steer toward nearby enemies. Furnace Spiral · Team role: Controller Hits enemies in a ring around its center. Area: around the partner · radius 3.8 m · Every 7.5s while fighting Hit effect: slow for 0.5s · burn for 1.5s At level 8: Also pulls enemies toward the impact.
Ashpip → Sootplume
Healing presence · Restores a little hero health continuously while conscious. Soot Wing · Team role: Controller Sweeps a fan toward its target. Target: cluster of enemies · detection 4.3 m · Every 6.5s while fighting Hit effect: slow for 1.6s At level 8: Burns enemies at the target for 2.5s.
Oreling → Anvilorn
Three-shot fan · Fires three lighter shots in a spread. Anvil Guard · Team role: Guardian Grants 1.5s of protection and hits a 3 m area around the hero. Area: around the hero · radius 3 m · Every 9s while fighting Hit effect: slow for 0.7s At level 8: Adds a second impact after 0.5s.
Brassmidge → Bellowsmidge
Chilling shots · Hits slow enemies. Bellows Swarm · Team role: Channeler Fires aimed shots at up to five enemies. Target: nearest enemy · detection 10 m · Every 6s while fighting Hit effect: burn for 1.1s At level 8: Adds a chain to up to two nearby enemies.
Charspout → Copperspout
Protective volleys · Every fifth successful volley grants 35% damage protection. Copper Jet · Team role: Striker Fires a projectile that can pierce five enemies. Target: strongest enemy · detection 10 m · Every 6.5s while fighting Hit effect: burn for 1.4s At level 8: Adds extra branching strikes.
Embermole → Kilnmole
Piercing shots · Shots pierce several enemies. Kiln Furrow · Team role: Hunter Strikes three points along the attack path. Target: enemy closest to the hero · detection 8 m · Every 6s while fighting Hit effect: burn for 1.2s At level 8: Also attacks behind the partner.
Slaglet → Basaltusk
Burning shots · Hits burn enemies over time. Basalt Break · Team role: Guardian Blasts a 2.7 m area around its target. Target: enemy closest to the hero · detection 8 m · Every 8s while fighting Hit effect: slow for 0.9s At level 8: Also grants 1.5s of protection.
Flintail → Flintflare
Rapid attacker · Moves faster and fires more often. Flint Fork · Team role: Striker Hits the target and up to two nearby enemies within 3 m. Target: strongest enemy · detection 9 m · Every 6s while fighting Hit effect: burn for 1.5s At level 8: Adds a second impact after 0.5s.
Kettlekin → Cruciblord
Homing shots · Shots steer toward nearby enemies. Crucible Draw · Team role: Mender Hits its target; a successful hit heals the hero for 2 HP. Target: strongest enemy · detection 8 m · Every 8s while fighting Hit effect: burn for 1s At level 8: Also heals the hero for 2 HP and conscious partners for 4% health.
Sootsnail → Smokestack
Healing presence · Restores a little hero health continuously while conscious. Soot Well · Team role: Controller Draws nearby enemies toward the impact. Target: cluster of enemies · detection 8 m · Every 7.5s while fighting Hit effect: slow for 1.4s At level 8: Burns enemies at the target for 2.5s.
Cinderloom → Furnaceloom
Three-shot fan · Fires three lighter shots in a spread. Furnace Weave · Team role: Channeler Cuts two intersecting lanes through the crowd. Target: cluster of enemies · detection 9 m · Every 8s while fighting Hit effect: burn for 1.4s At level 8: Adds extra branching strikes.
Pumicepup → Obsidianhound
Chilling shots · Hits slow enemies. Obsidian Pounce · Team role: Hunter Strikes and pushes the threat away, granting the hero 1s of protection. Target: enemy closest to the hero · detection 9 m · Every 5.5s while fighting Hit effect: slow for 0.6s At level 8: Adds a finishing hit if the target is below 50% health.
Moonveil · 15
Glintling → Prismgazer
Homing shots · Shots steer toward nearby enemies. Prism Ray · Team role: Channeler Fires a projectile that can pierce five enemies. Target: strongest enemy · detection 10 m · Every 6.5s while fighting Hit effect: slow for 0.5s At level 8: Adds extra branching strikes.
Mothmere → Velvetmere
Healing presence · Restores a little hero health continuously while conscious. Velvet Sweep · Team role: Controller Sweeps a fan toward its target. Target: cluster of enemies · detection 4.2 m · Every 6.5s while fighting Hit effect: slow for 1.6s At level 8: Freezes enemies at the target for 0.65s (bosses: 0.15s).
Crescentip → Crescentveil
Three-shot fan · Fires three lighter shots in a spread. Crescent Cut · Team role: Hunter Hits enemies in a ring around its center. Area: around the partner · radius 3.7 m · Every 6s while fighting Hit effect: slow for 0.8s At level 8: Also attacks behind the partner.
Silkwhisper → Silkseraph
Chilling shots · Hits slow enemies. Silk Cradle · Team role: Mender Heals the hero for 3 HP and conscious partners for 5% health, then hits a 2.5 m area around the hero. Area: around the hero · radius 2.5 m · Every 9s while fighting Hit effect: slow for 1.2s At level 8: Also pulls enemies toward the impact.
Shimmeroot → Stellaroot
Protective volleys · Every fifth successful volley grants 35% damage protection. Star Root · Team role: Controller Cuts two intersecting lanes through the crowd. Target: cluster of enemies · detection 9 m · Every 7.5s while fighting Hit effect: slow for 1.5s At level 8: Adds a chain to up to two nearby enemies.
Duskskein → Nighttapestry
Piercing shots · Shots pierce several enemies. Night Tapestry · Team role: Guardian Grants 1.5s of protection and hits a 3 m area around the hero. Area: around the hero · radius 3 m · Every 8.5s while fighting Hit effect: slow for 1s At level 8: Also attacks behind the partner.
Lullabit → Dreamhare
Burning shots · Hits burn enemies over time. Dream Hush · Team role: Controller Blasts a 2.8 m area around its target. Target: enemy closest to the hero · detection 8 m · Every 7s while fighting Hit effect: slow for 2s At level 8: Freezes enemies at the target for 0.65s (bosses: 0.15s).
Velourbead → Astrabead
Rapid attacker · Moves faster and fires more often. Astral Relay · Team role: Channeler Chains through up to four enemies, jumping within 3.4 m. Target: strongest enemy · detection 9 m · Every 7s while fighting Hit effect: slow for 0.8s At level 8: Also grants 1.5s of protection.
Whispfin → Wispcurrent
Homing shots · Shots steer toward nearby enemies. Wisp Current · Team role: Controller Draws nearby enemies toward the impact. Target: cluster of enemies · detection 8 m · Every 7s while fighting Hit effect: slow for 1.4s At level 8: Also attacks behind the partner.
Inkglow → Inkhalo
Healing presence · Restores a little hero health continuously while conscious. Ink Pool · Team role: Controller Creates a 2.6 m field that strikes three times over 1.3s. Target: cluster of enemies · detection 8 m · Every 8s while fighting Hit effect: slow for 1.3s At level 8: Adds extra branching strikes.
Astercoil → Astralcoil
Three-shot fan · Fires three lighter shots in a spread. Astral Circuit · Team role: Channeler Hits a 3.5 m area around the hero. Area: around the hero · radius 3.5 m · Every 7s while fighting Hit effect: slow for 0.8s At level 8: Adds a chain to up to two nearby enemies.
Nebulamb → Nebulamane
Chilling shots · Hits slow enemies. Cloud Remedy · Team role: Mender Hits its target; a successful hit heals the hero for 2 HP. Target: strongest enemy · detection 8 m · Every 7.5s while fighting Hit effect: slow for 0.6s At level 8: Also heals the hero for 2 HP and conscious partners for 4% health.
Moonquill → Lunaquill
Protective volleys · Every fifth successful volley grants 35% damage protection. Lunar Quills · Team role: Hunter Fires aimed shots at up to five enemies. Target: nearest enemy · detection 10 m · Every 6s while fighting Hit effect: slow for 0.5s At level 8: Adds a finishing hit if the target is below 50% health.
Chimelet → Hushchime
Piercing shots · Shots pierce several enemies. Hush Peal · Team role: Channeler Hits enemies in a ring around its center. Area: around the partner · radius 3.4 m · Every 7s while fighting Hit effect: slow for 1.3s At level 8: Also heals the hero for 2 HP and conscious partners for 4% health.
Velvetuft → Velvetcrown
Burning shots · Hits burn enemies over time. Velvet Hunt · Team role: Hunter Deals 80% more signature damage when the target is below 40% health. Target: lowest-health-percentage enemy · detection 9 m · Every 5.5s while fighting Hit effect: slow for 0.5s At level 8: Adds a second impact after 0.5s.
Rimefield · 15
Frostnook → Glaciernook
Chilling shots · Hits slow enemies. Glacier Shelter · Team role: Guardian Grants 1.5s of protection and hits a 3 m area around the hero. Area: around the hero · radius 3 m · Every 8.5s while fighting Hit effect: slow for 1.1s At level 8: Freezes enemies at the target for 0.65s (bosses: 0.15s).
Flurrel → Snowmantle
Protective volleys · Every fifth successful volley grants 35% damage protection. Snowmantle Sweep · Team role: Controller Sweeps a fan toward its target. Target: cluster of enemies · detection 4.1 m · Every 6.5s while fighting Hit effect: slow for 1.7s At level 8: Also attacks behind the partner.
Rimebud → Rimeblossom
Piercing shots · Shots pierce several enemies. Rime Bloom · Team role: Mender Heals the hero for 3 HP and conscious partners for 5% health, then hits a 2.8 m area around the hero. Area: around the hero · radius 2.8 m · Every 9s while fighting Hit effect: slow for 1.2s At level 8: Freezes enemies at the target for 0.65s (bosses: 0.15s).
Hailhop → Hailbound
Burning shots · Hits burn enemies over time. Hail Leap · Team role: Hunter Strikes and pushes the threat away, granting the hero 1s of protection. Target: enemy closest to the hero · detection 9 m · Every 5.5s while fighting Hit effect: slow for 1.3s At level 8: Adds extra branching strikes.
Iceskein → Crystalskein
Rapid attacker · Moves faster and fires more often. Crystal Lattice · Team role: Controller Cuts two intersecting lanes through the crowd. Target: cluster of enemies · detection 9 m · Every 7.5s while fighting Hit effect: slow for 1.6s At level 8: Also pulls enemies toward the impact.
Tundrump → Tundraking
Homing shots · Shots steer toward nearby enemies. Tundra Drum · Team role: Guardian Hits a 3.2 m area around the hero. Area: around the hero · radius 3.2 m · Every 8s while fighting Hit effect: slow for 1s At level 8: Also grants 1.5s of protection.
Sleetspike → Glacierpike
Healing presence · Restores a little hero health continuously while conscious. Glacier Pike · Team role: Striker Fires a projectile that can pierce five enemies. Target: strongest enemy · detection 10 m · Every 6.5s while fighting Hit effect: slow for 1s At level 8: Adds a chain to up to two nearby enemies.
Snowettle → Snowcitadel
Three-shot fan · Fires three lighter shots in a spread. Citadel Ring · Team role: Guardian Hits enemies in a ring around its center. Area: around the partner · radius 3.5 m · Every 8s while fighting Hit effect: slow for 1.4s At level 8: Freezes enemies at the target for 0.65s (bosses: 0.15s).
Icicub → Icimantle
Chilling shots · Hits slow enemies. Ice Paw · Team role: Striker Sweeps a fan toward its target. Target: nearest enemy · detection 3.5 m · Every 5.5s while fighting Hit effect: slow for 1s At level 8: Adds a second impact after 0.5s.
Shiverfin → Polarfin
Protective volleys · Every fifth successful volley grants 35% damage protection. Polar Furrow · Team role: Hunter Strikes three points along the attack path. Target: enemy closest to the hero · detection 9 m · Every 6s while fighting Hit effect: slow for 1.3s At level 8: Also attacks behind the partner.
Driftbell → Aurorabell
Piercing shots · Shots pierce several enemies. Aurora Shelter · Team role: Mender Creates a 2.8 m field that strikes three times over 1.3s. Target: cluster of enemies · detection 8 m · Every 8.5s while fighting Hit effect: slow for 1.5s At level 8: Also heals the hero for 2 HP and conscious partners for 4% health.
Chilltuft → Borealtuft
Burning shots · Hits burn enemies over time. Boreal Volley · Team role: Striker Fires aimed shots at up to five enemies. Target: nearest enemy · detection 9 m · Every 6s while fighting Hit effect: slow for 0.8s At level 8: Adds extra branching strikes.
Glazeling → Glassgarde
Rapid attacker · Moves faster and fires more often. Glass Reprisal · Team role: Guardian Strikes enemies along a narrow line. Target: strongest enemy · detection 9 m · Every 7s while fighting Hit effect: slow for 1.2s At level 8: Also grants 1.5s of protection.
Frostwhorl → Blizzardwhorl
Homing shots · Shots steer toward nearby enemies. Blizzard Eye · Team role: Controller Draws nearby enemies toward the impact. Target: cluster of enemies · detection 8 m · Every 7s while fighting Hit effect: slow for 1.7s At level 8: Freezes enemies at the target for 0.65s (bosses: 0.15s).
Flakehorn → Crownflake
Healing presence · Restores a little hero health continuously while conscious. Crownfall · Team role: Channeler Blasts a 2.6 m area around its target. Target: strongest enemy · detection 9 m · Every 7.5s while fighting Hit effect: slow for 1.2s At level 8: Adds a chain to up to two nearby enemies.
PokéBonk Survivors beginner guide
Try these two beginner routes for movement, upgrades and team choices. Upgrade offers are random, so use the alternatives when your first choice does not appear.
Your first minute
Start in Greenmere on Wander with Mossheart. Keep moving in small loops, let enemies follow, and return for the motes after your attacks clear a gap.
Take an extra move when it helps clear the crowd. Walk close enough to collect experience, without crossing a packed group just for a single mote.
At level 6 your starter awakens automatically. Keep the crest in use when it opens an escape route; save a ready dash for a warning or a narrow gap.
When the first elite falls, bind it. If your health is low, keep a wider loop while Mossheart recovers rather than standing still beside the new companion.
Recovery route · Mossheart
Prioritize Pulse Nova for breathing room and Thorn Orbit for enemies that reach you. If neither is offered, improve the primary attack or take Marrow Tonic.
Add Frost Bloom for crowd slowing or Seeker Motes for attacks while retreating. Choose Bark Plating when repeated contact damage is the problem.
Brambleback helps slow and pierce approaching enemies. Dewbell restores health while awake; avoid replacing it solely for a larger base-damage number.
Use Bloomwell when you need health and nearby damage. More recovery does not let you safely stand inside a boss warning.
Ranged pressure · Cinderfang
Start with primary upgrades and Spark Tonic; add Sap Lance to hit lines of enemies or Arc Spray for a wider firing fan.
Choose Cinder Comet for a delayed blast or Seedwheel to cover several directions. Use Quill Tonic to increase attack cadence, while keeping one defensive option such as Marrow Tonic.
Voltwhisk contributes frequent homing shots; Ironroot pierces several targets. Keep enough open ground to let those shots work.
Cinderfang has no starting regeneration. Spend a crest to make space before you are surrounded, and resist damage-only pact choices when already near defeat.
Make the upgrade screen work for you
You can carry five moves including the primary attack, so at most four additional moves. Each move can reach level 5; taking every new move early leaves fewer choices for a focused build.
Each run starts with two rerolls, two skips and one banish. Completing the stage challenge adds one reroll, up to three held at once. A skip gives up that upgrade and restores 8% of maximum health. Banish removes the chosen unlearned move from this run’s offers and redraws immediately without spending the level.
Only banish a move you do not want in this run. There is no permanent penalty to future runs, and a banished move is not removed from your collection.
Three bosses, one dawn
Classic: PokéBonk Survivors bosses arrive about every three minutes. Hasty trial shortens the interval to 45 seconds for a faster challenge. Watch the ground warning rings, move out of danger and use a dash when you need space. Defeating the first two bosses offers a pact: a powerful bonus with a drawback that lasts for the run. Defeat all three bosses to win.
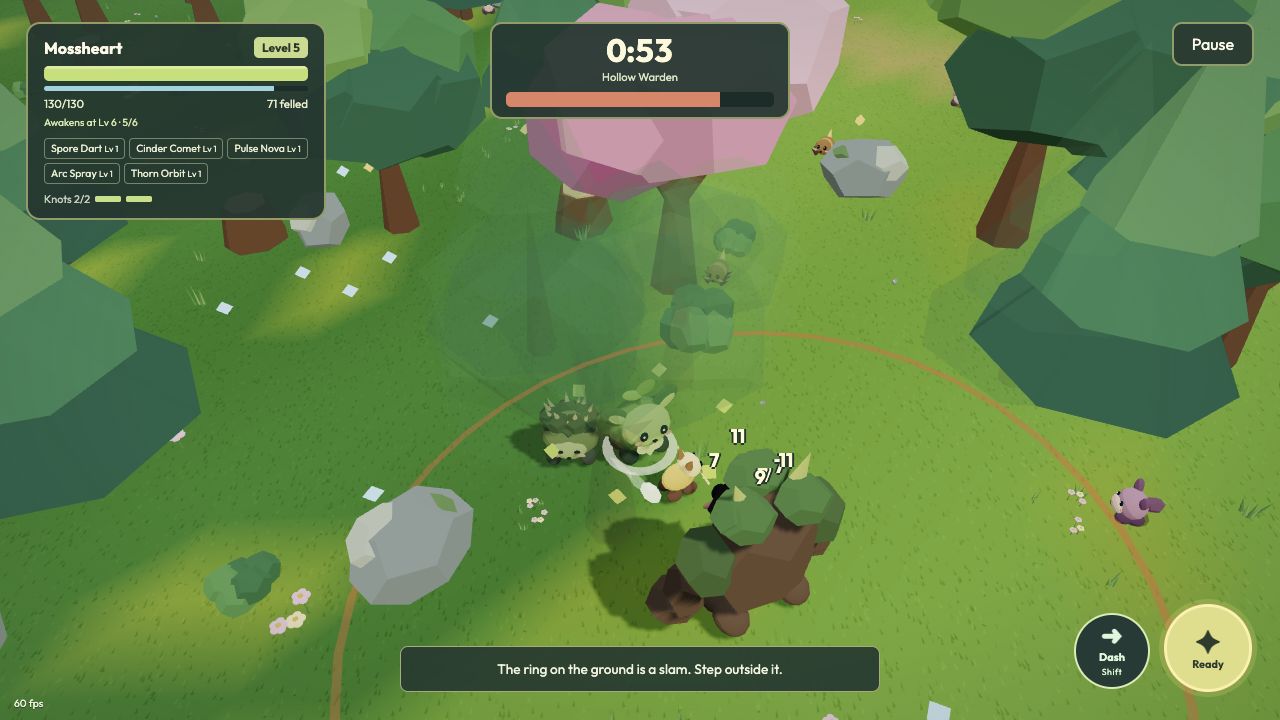
0:53 — Brambleback and Voltwhisk are on the team. Keep moving away from Hollow Warden’s orange warning ring while your team attacks.3D characters · Greenmere · Wander · Hasty trial · keyboard and mouse.
Read the three boss attacks
Classic · Phase 1
Hollow Warden slows to wind up, then releases an expanding ring and summons six Nibs. Leave space behind you before the warning; clear the small enemies without circling back into the ring.
Kiln Titan locks a straight charge direction during a 1.1-second warning, then charges for 0.75 seconds. Move sideways out of its line; running directly away can keep you on that line.
Rift Matron marks three fixed impact positions. The blasts arrive after 1.1, 1.6 and 2.1 seconds. Keep moving toward unmarked ground; dodging the first circle is not the end of the sequence.
After each of the first two bosses, choose one of two pacts. The next boss countdown restarts after the previous boss is defeated. Defeating the third boss ends the run.
At half health, guardians enter phase two after a safe warning: Hollow Warden releases two waves, Kiln Titan leaves a burning charge lane, and Rift Matron marks five strikes. Keep moving out of the warnings.
Pacts: read both sides
Each pact lasts for this run. Leaden adds health but makes escapes slower; Glass and Frenzy raise damage pressure at a survival cost. Ember drains health toward 1, so it cannot kill you by itself, but the next enemy hit can. The offer is a choice between two pacts, not a promise that your preferred one will appear.
Glass Pact
+32% strike power · −22% maximum vigor
Leaden Pact
+35% vigor · −14% move speed
Greedy Pact
+30% experience, +28% pickup reach · −16% strike power
Frenzy Pact
+22% attack speed · You take 18% more harm
Ember Pact
A burning aura around you · Your vigor slowly seeps, but never to zero
Earn Cinders at the end of each PokéBonk Survivors run and spend them on permanent upgrades before starting again. Rootbroth improves starting health, Kiln Salt improves attack, Mote Lantern helps collect experience, Quiet Study increases experience gains and Third Knot adds a companion slot. Lab ranks, currency, records, journal entries and settings are saved locally. Sign in through Account & cloud save to sync saved progress between devices. An unfinished run is not saved. Clearing site data erases guest progress; confirm that the cloud status is up to date before changing devices.
What to buy with your first Cinders
If you keep losing health, the first Rootbroth rank costs 20 Cinders and adds 14 starting health. If you clear too slowly, the first Kiln Salt rank costs 20 and adds 7% starting attack.
If you leave too much experience behind, Mote Lantern starts at 15 Cinders and adds 0.45 pickup reach per rank. Quiet Study starts at 20 and adds 8% experience per rank.
Third Knot is a one-time 50-Cinder upgrade. Buy it when you can reach and defeat several elites; it adds capacity, not a free companion at the start.
All lab prices in Cinders
Cinder Lab
Rank costs
Rootbroth
20 → 35 → 55 → 85 → 120
Kiln Salt
20 → 35 → 55 → 85 → 120
Mote Lantern
15 → 30 → 50 → 75 → 110
Quiet Study
20 → 35 → 55 → 85 → 120
Third Knot
50
Account & cloud save
Play as a guest, or sign in to sync Cinders, lab ranks, records, collection counts and settings across devices. Your progress usually syncs within 90–120 seconds while connected. Run results and lab purchases sync sooner; local saves happen immediately. Wait for “Cloud up to date” before switching devices; a running match is not saved.
Account progress is stored on our Cloudflare service. A session cookie keeps you signed in for up to 30 days. After the page has loaded, you can keep playing if the connection drops; reloading still needs internet.
Choose which progress to continue. Automatic sync is paused until you choose.
This replaces the local progress and settings shown above. A recovery copy is kept on this device first. The page language stays unchanged.
Signing out keeps progress on this device and stops cloud uploads.
No email is collected, and password recovery is not available. Keep your username and password in a password manager. Use a password you do not use elsewhere.
Circle the edge of a crowd instead of stopping inside it. Leave yourself a route toward clear ground.
Collect experience early. Reaching level 6 unlocks your awakening, while abandoned motes do not help your current build.
Use a ready crest when it makes room or saves health. Save a dash for a tight gap or a boss warning.
Mossheart offers recovery, Cinderfang adds burn damage, and Tideward offers protection. Lumenloop, Brassbur and Mistwhorl offer other movement and survival styles.
Browser help & compatibility
Use a browser with JavaScript and WebGL 2 enabled. Graphics performance depends on your device and browser settings.
Playing on desktop or mobile
On a computer, use WASD or the arrow keys to move, Shift to dash, and Space or E for your ultimate. On a touch screen, use the left joystick and the action buttons on the right. Performance varies across phones and tablets. Use the check below to see whether graphics and local storage are available on your device.
Blank scene or graphics error
Reload once. If it persists, open the site in an up-to-date standalone browser. Check whether graphics / hardware acceleration is available in that browser, then restart it. Some remote desktops and virtual machines may not expose WebGL 2.
Stutter, heat or interrupted graphics
Close other heavy tabs, turn off screen shake in the game options and reduce the browser window size. Pause before changing apps. After a graphics interruption, reload the page; the current run cannot be resumed.
No sound or controls do not respond
Sound starts muted: enable it in the game options and tap or click the game. Resume if paused. Use WASD / arrows on desktop, or the left touch stick and right action buttons on a touch device.
Progress is missing
Return to the same browser profile and https://pokebonksurvivors.com. Private browsing or blocked site storage may not retain local progress. Do not clear site data as a first troubleshooting step: that erases local saves.
These checks run on your device. The report includes browser version, screen size, graphics availability and storage access; it contains no save data and is not sent automatically.
PokéBonk Survivors FAQ
Does PokéBonk Survivors have achievements?
Open Achievements from the main menu to see 16 badges for victories, battles, companions and stage challenges. Combat records update when a run ends. Badges do not grant extra Cinders; collection milestones and first challenge clears keep their own rewards.
How can I share my results?
Choose Share your adventure after a run, or share a badge from Achievements. Save the card or send it through your device’s share menu. Every card includes the game website and a QR code. Social links carry text and a game link; attach your saved image separately.
Is PokéBonk Survivors free?
Yes. You can play the whole browser game for free without creating an account. There are no paid upgrades.
Do I need to download PokéBonk Survivors?
No. Play directly on this page in a browser with JavaScript and WebGL 2 enabled. Use the Play button to choose a starter and begin.
Can I play PokéBonk Survivors on a phone?
Yes, the game includes a touch joystick and on-screen dash and ultimate buttons. Use a recent browser with WebGL 2 support; performance depends on your device.
How do creatures evolve?
Your starter automatically awakens at level 6 during a run: Mossheart → Crownmoss, Cinderfang → Ashmaw, Tideward → Leviglass, Lumenloop → Halocrest, Brassbur → Bastionbur, Mistwhorl → Tempestwhorl, Sunspool → Dayweaver and Veilwing → Nightsail. A new run starts with the base form.
How long is a PokéBonk Survivors run?
Normal boss intervals are about three minutes, or 45 seconds in Hasty trial. You win by defeating three bosses, so total time also depends on how quickly you defeat them.
Does progress sync between devices?
Yes, when signed in. Open Account & cloud save to register or log in, then choose the local or cloud progress if they differ. Saved Cinders, lab upgrades, records and the field journal sync automatically. Guests stay local. An active run cannot be resumed after closing the page.
Is there multiplayer?
This is a single-player game. Your captured companions are controlled by the game.